Thursday 29 September 2011

Macro Photography Tips

Much has been written on the topic of Macro photography for those photographers fortunate enough to own a DSLR with macro lenses – but what about if you own a compact point and shoot camera? Can you get great macro shots too?
While the results achievable with a point and shoot camera in macro mode probably won’t compare with a DSLR with a purpose built macro lens I’ve still seen some remarkably good shots with compact cameras (all three shots in this post were taken with compact cameras). Here are a few tips to help you get the most out of yours:


Select Macro Mode – this is a fairly obvious first step but I’m always surprised by how many digital camera owners haven’t explored the shooting modes that their camera has. Macro mode is generally symbolized with a little flower and when selected it will tell your camera that you want to focus on a subject closer to your lens than normal (the minimum distance allowed will vary from camera to camera – consult your instruction manual to find yours). Macro mode will also usually tell your camera to choose a large aperture so that your subject is in focus but the background is not.
Use a Tripod – in macro photography a tripod can be particularly useful, even if you’re just shooting with a compact camera. Keeping your camera still not only improves your shots (getting rid of camera shake) but it allows you to play around with different settings without losing your composition.

Aperture – once in macro mode some cameras will not allow you to make many other adjustments but if you are able to play with your aperture settings it can be well worthwhile to do so. As we’ve covered in our Aperture tutorials, the main thing that aperture impacts is the depth of field of your shots. Choose a small aperture (big number) if you want a large depth of field with everything in focus or a large aperture if you just want your main subject in focus. In macro photography you’ll probably want a shallow depth of field so select the largest aperture available.


Focusing – I find that in macro photography it is helpful to have full control over focusing – especially when you have shallow depth of fields where it is all the more important to make sure the right part of your shot is in focus. If your camera allows manual focusing select this option and manually focus on the part of our subject that is the main point of interest.
Composition – remember some of the basic rules of composition like the Rule of Thirds. Make sure your image has a main point of interest and place that focal point in a smart position in your image in order to draw the eye of your viewer. Try to select a non cluttered or simple background for your main subject so as it doesn’t compete with it visually.

Flash – in many macro shots having some artificial light is important. The challenge with compact cameras is that most give you limited control of your flash. As a result choosing a good time of day when there is plenty of available light is probably your best bet.

If you do need more light check to see if your camera allows you to pull back the level that your flash fires at. Alternatively you might like to try diffusing it in some way (tissue paper or cellotape over the flash for example). Another option might be to use some other source of artificial light or to invest in a reflector to help make the most of available light. Experiment with different methods of lighting your subject.
Take Your Shot - once you have your shot lined up and in focus take your shot. Make sure once you’ve taken it to take a good look at it on your LCD, zooming in to make sure that your focusing is sharp. Try shooting at slightly different apertures, with different compositions and focusing on different points of your subject to see what works best.
Macro Lens Attachments – some compact cameras actually have accessories available to help with macro/close up photography. These will enable you to enlarge your subject and/or decrease your minimum focal length. These might be worth investing in if you intend on doing a lot of macro work.
Self Timer – (this point was added as a result of comments below – thanks team!) when using my DSLR for Macro work I tend to use a shutter cable release and tripod to make sure my shots are completely still (to eliminate the small amount of camera shake from pressing the shutter). Most compact cameras don’t have cable releases but a simple way around this is to use your camera’s self timer on it’s shortest time setting which will similarly mean you have no movement of your camera when taking your shot (if you’re taking notice of the ‘use a tripod’ tip above).
PS: I’ve used the term ‘macro photography fairly loosely here. Technically ‘macro photography’ is actually when you produce an image where your subject is captured on your image sensor at life size (or bigger) with a 1:1 ratio.
In the case of most (all?) compact cameras this is not achieved and in fact ‘close up’ photography would be a better description. However as most manufacturers call their close up mode ‘macro mode’ I’ve used the term for the purposes of this article.

HDR Photography

This is a detailed guide about taking photos for an HDR image. Practice has shown that successful and smooth HDR photography takes careful planning and sets certain requirements for the gear. Some might feel that HDR photography is complicated and time consuming. However, if you have the right camera, the hardest part is setting up a tripod and the rest is simple and fast.

This is a detailed guide about taking photos for an HDR image. Practice has shown that successful and smooth HDR photography takes careful planning and sets certain requirements for the gear.


HDR How to Part 1: Photography Gear

The first part of this tutorial discusses photography gear. According to my knowledge it isn't possible to capture HDR photos with any of today's digital consumer cameras. Therefore the HDR image must be created by merging several normal photos. The idea is to take the same photo several times with varying exposures and merge them all to form one HDR photo. So in theory, the photos can be taken with any camera that allows manual shutter speed adjustment. The exposure between shots must be changed with shutter speed because changing the aperture would change depth of field.
Many modern cameras (point and shoot, bridge, slr) have several features that make it easier to photograph for an HDR image:
  • Manual settings
  • Exposure bracketing (EB)
  • Continuous shooting
  • Timer

Manual Settings

Photos taken for an HDR image should be similar apart from exposure. The following camera settings should be fixed in each shot:
  • White balance
  • ISO sensitivity (perhaps not necessary but highly recommended)
  • Aperture
  • Focus
  • Possible digital image processing operations that camera might execute (for example color correction or sharpening)
The possibility to turn automatism off and adjust these settings manually is good for HDR photography.

Exposure Bracketing (EB)

Exposure bracketing is a technique of taking several photos with varying exposures. A digital camera can change exposure in several ways. When it comes to HDR photography, its essential that exposure is controlled by shutter speed while keeping aperture and ISO sensitivity fixed. Other things to notice in camera's EB functionality are the amount of bracketed shots and the exposure interval. Many cameras only allow three shots with 1 EV interval. In my opinion that isn't enough for HDR photography. It's better if there is a possibility to bracket more shots or at least a possibility to increase the exposure interval. (Personally I take bracketed shots with Nikon D300 which is an ideal camera for this kind of work. Nikon D300 allows 2 to 9 shots with 1/3, 1/2, 2/3 or 1 EV intervals. I always bracket 9 shots with 1EV interval to make sure I capture the scene as well as possible.)


Continuous Shooting

Continuous shooting means that the camera takes photos continuously while the shutter release button is held. Continuous shooting makes it possible to take bracketed shots automatically which makes HDR photography a little simpler. The faster the continuous shooting, the better the results. (Continuous shooting speed depends on the camera, storage and file format)

Timed Continuous Shooting

Timed continuous shooting makes it possible to take the bracketed shots automatically and by using timer. Timed shooting removes camera shake and makes the whole process easier.
To sum up, an ideal camera can use timer to automatically take many bracketed shots with adjustable exposure interval. This kind of functionality (like in Nikon D300) makes HDR photography pretty simple. Unfortunately there are only handful of digital cameras available that offer this good functionality for HDR photography. In an ideal camera, the user could define any exposure interval and any number of bracketed shots. Michael Reichmann (The Luminous Landscape) made a wish for this kind of functionality already in 2005.
Along with the camera, one should have a sturdy tripod and a lens hood to be well equipped for an HDR photography. Sturdy tripod makes sure the camera stays still while taking the bracketed shots. A tripod makes things easier but its possible, in bright conditions, to shoot even hand held. Photoshop is able to align the photos correctly even with some camera movement between the shots. If there is a lot of camera movement, the final HDR image must be cropped considerably and therefore good amount of resolution is lost.
HDR photography is well suited for high contrast scenes. High contrast scenes often include very bright areas such as light sources or reflections that might cause lens reflections. Its recommended to use lens hood to avoid as many lens reflections as possible.


HDR How to Part 2: Taking the photos in Practice

The second part of this tutorial describes the process of photographing for an HDR image. Some might feel that HDR photography is complicated and time consuming. However, I feel that if you have the right camera, the hardest part is setting up a tripod and the rest is simple and fast.
I used the following gear with all example shots in this tutorial:
  • Nikon D300
  • Nikon Nikkor AF-S DX VR 18-200mm f/3.5-5.6G
  • Lens Hood
  • Manfrotto 190PROB tripod
  • Manfrotto 460MG camera head

Choosing the Scene

It's relevant to choose a scene with high dynamic range (high contrast). Low contrast photography doesn't really benefit from HDR technique because digital camera is able to capture the whole dynamic range with one shot. Besides the dynamic range, one should look for scenes without moving subjects. Many times moving subjects can be avoided by waiting. For example If you photograph nature, wait for the strong wind to calm down.

Preparing for the Photography

  • Attach the lens hood
  • Compose the scene
  • Setup the tripod
  • Adjust camera settings (aperture, shutter speed, ISO sensitivity, white balance, focusing mode, exposure bracketing, continuous shooting, timed shooting)

It's important to understand that HDR technique isn't a magic that makes photos look good. In fact, HDR photo without digital image processing looks ugly. I'd like to emphasize that even though in HDR photography you must give a lot of thought to the technique and equipment, don't forget image composition!
Finally, fine tune your composition on tripod:
  • Check the scene for lens reflections
  • Check the scene for other distracting elements (especially on the edges of the scene)
  • Check that the horizon is straight (assuming that's what you are going for)

Taking the Photos

If your camera has exposure bracketing, you adjust the exposure just like you would with one photo. Finally the series of photos are taken by using the timer or by pressing the shutter release button.
Even though your camera would be missing the EB function, you can still do HDR photography. The series of photos can be taken manually by adjusting shutter speed after each shot. I think that about 1EV-1.5EV difference between exposures is good. The benefit of the manual photography is the possibility to take as many shots as you like. The downsides are possible camera shake and slower photography. If the series of photos is taken too slowly, even slow movement such as clouds, might cause problems.


High Speed Photography

High Speed Photography is used in physics, health research, sports and more. This article describes how to capture super fast movements using ordinary camera gear and a little home made electronics.
How to take photos like the one you are seeing here. It's a glass of Champaign, being shot with a BB gun. It is the same idea as posted in this gallery. You can use this technique to take picture of exploding things like tomatoes, watter balloons, watermelons, or even you Canon camera as you smash it against a wall for not understanding the menus (Sorry, could not resist...) 

Freezing fast motion (AKA High Speed Photography), can give some pretty special photographic effects. High Speed Photography is used in physics, health research, sports and more. This guide describes how to capture super fast movements using ordinary camera gear and a little home made electronics. I will describes the setup I used the problems I encountered and what I did to solve or work around them.

Here is a nice example of High Speed Photography:

Capturing a balloon just as it punctures

Nuking an apple 


Capturing such images introduces a lot of challenges. How does one handle timing with exposures times

faster than 1/6000 second!?
We have to handle shutter lag, synchronize the flash and time the exposure to just the right moment.

But the shutter lag of any normal camera is so long that it will be all most impossible to time the exposures. And how do you synchronize the flash with an exposure time of less than 1/6000 second?
To work around the problems with shutter lag and flash synchronization, the exposure is done in a completely dark room. This way the shutter can opened without actually getting an exposure. The exposure time set on the camera just has to be long enough for the action to happen while the shutter is still open. Because the room is dark, the long exposure time will not have any effect on the final output (this is because no light enters the lens to hit the sensor / film)

To actually get an "exposure", a flash is fired. The flash light duration will now become the actual

exposure time.
SO now we need to see how long does it takes the flash to fire. It turns out that the output power of the flash, actually affects the duration of the light, so to get exposure times. If you need exposure faster than 1/6000 seconds, the output needs to be reduced. For more information on the light duration please see the test I ran on my Sigma EF-500 flash.
Now we only need to synchronize the flash with the action we want to capture.
This can be done in several ways. For example synchronizing with a balloon puncture, can be done via sound. Impact-actions, like a BB Soft air gun pellets, can be triggered with a mechanical switch, like in the picture below. When the pellet hits the cd-cover it's pushed on to the switch, which then triggers the flash.

The Gear:
  • Balloon (OK - we are going to nuke this one, so don't use your favorite)
  • Digicam
  • Tripod
  • Sigma Flash
  • Home made sound trigger (more info). If you do not have an optical slave you can use the Universal Sound Slave Circuit
  • Needle (or BB-gun, see below)
  • Backdrop (I use a black Bristol sheet)
The Setup
First step is to set-up the scene. The black Bristol sheet is used as backdrop. The balloon, flash, microphone
and camera are placed like in to image below 
 
 
Gear settings:
  • Flash: optical slave and 1/16 output power.
  • Camera: Exposure time: 1-2 sec. ISO 100-200 Aperture F 11-16 manual focus.
  • Microphone: The distance between the balloon and microphone, is used for synchronization. 50-70cm is good for balloon punctures :-)
Next step is framing and focusing:
While trying to stay within the best performance on the lens, I either zoom or move the tripod, until I have the desired framing. Focus can be obtained either automatic or manual, but do remember to switch to manual to lock focus, otherwise the camera will try to focus when the lights are switched off.
Now it's time to test the setup and lightning. All lights are switched off and the shutter is set to bulb.

To fire the flash I just clap my hands. Then I review the image on the camera, checking for exposure, framing, focus and DOF.
To get the correct amount of light / exposure, one can Increase or decrease:

- the strobe distance to the balloon

- the output power of the flash

- the aperture on the camera

- ISO sensitivity on the camera

Taking the shot (pan intended :))
The test is repeated until satisfactory result have been reached, and the real photo can be taken. This is done the same way as when testing, but instead of clapping, the balloon is punctured with a needle.

One could also just fill the balloon with water and shoot it with a BB Soft air gun :-)


This article was contributed by Karsten Stroemvig (aka Lullaby), see his other great high speed photograph projects
 

Infrared Photography

What is the Infrared Spectrum? Well, take a good look around you and you’ll see and endless diversity of hues in all the colors of the rainbow: The grass is green, the sky is blue, the roses are red and the future is bright. Now imagine that on top of all the colors you can see, there are other ranges that are normally invisible to us, colors that for us don’t exist but they’re out there and for some animals they are a part of everyday life. This is the Infra-Red (IR) spectrum and in this article you will learn how to photograph it effectively.


Take a good look around you and you’ll see and endless diversity of hues in all the colors of the rainbow: The grass is green, the sky is blue, the roses are red and the future is bright. Now imagine that on top of all the colors you can see, there are other ranges that are normally invisible to us, colors that for us don’t exist but they’re out there and for some animals they are a part of everyday life. I am talking about the Infra-Red (IR) spectrum and in this article I will show it to you. By the way, clicking on the small photos will enlarge them.

Content:

1.     Introduction
2.     What is Infra-Red?
3.     How can we see it?
a.     Film cameras
b.    Digital cameras
c.     IR filter
4.     What does it do?
5.     Photographing techniques:
a.     White balance
b.    Light metering
c.     Focus
d.    Aperture
e.     Shutter
f.     ND filter
g.    Location location location
6.     Compositions
7.     Post processing:
a.     Switching channels
b.    Adjusting hues
c.     Sharpening
8.     Summary

1.   Introduction – To be honest, I feel a little like a magician revealing a trick. I suppose most of you look at the photos and think “hmmm… Is it snow? But it can’t be, it was taken in Israel in the middle of summer, so what is it? Wooow”. In this article you will understand exactly how the technique works, it is one of the less common forms of photography and I think one of the more fascinating ones. Enjoy.

2.   Infra-Red – The spectrum of light that is visible to us is only a small portion of an enormous spectrum of short and long electro-magnetic waves. An example of the short-length waves are X rays and Gamma rays that are filled with energy and an example of the long wave-lengths is Microwaves and Radio waves
Infra-Red light is divided into three groups: Near Infra-Red (Near IR) which is in the range of 700-1300 nm; Medium IR which is in the range of 1300-3000 nm and thermal IR which is in the range of 3000-30,000 nm. Thermal Infra-Red light is produced by warm objects while Near IR and Medium IR are reflected off objects just like visible light, which is produced by the sun. When it comes to photography, we will be dealing with the Near IR range.
3.   How can you see it? Well, you can’t. Seriously, unlike some animals, we can’t see Infra-Red light. But fortunately for us the camera can see it.

a.     With film cameras it is best to use a special IR film that is sensitive to that form of light. These kinds of films are used mainly in a special technique of capturing light, and most of them are black and white films and require special refrigeration.

b.    With digital cameras (like we love) the sensor is, fortunately, sensitive to Infra-Red light, so what’s the catch? Most cameras and especially the SLR ones contain a filter that blocks IR light and prevents it from ever reaching the sensor. The reason for it is to improve the final quality of the photo. How do I know that my camera is able to capture IR? A wise man taught me a trick: You take the television remote control, aim it at your camera and take a photo while pressing one of the remote control’s buttons. If you can see the remote control’s IR light bulb flash, the camera can capture IR, If not…Well then, I’m sorry. The most sensitive camera will show a sharp bright spot and the less sensitive ones will show a blurry smudged spot. The most IR friendly cameras are Sony’s, Minolta being the most advanced of them, the Nikon D70 (which I am using), Canon G3, G2 and more.

c.     So we have a camera, what now? We add the IR filter, whose purpose is to block all visible light except IR light, in front of the lens. The filter will look completely black to our eyes (because we are blind to IR light, remember?). The filters can be categorized according to the wave lengths of visible light that they block, for example Hoya R72 allows IR rays longer than 720 nm, the Hoya R90 (horribly expensive) allows IR rays longer than 900 and so on.
4.   What does it do? Well, so we’ve learned what IR light is, and how we can see it. But what is it good for? Infra-Red photography creates a very special effect of a dreamy photo out of this world because the hues that are shown are entirely different than those we see in reality, the foliage looks snowy white and the sky looks dark or even black. You can see landscapes that you are used to seeing every day in a truly “different light”. That is why I, and many others, like this photographing technique.

5.   Photographing techniques: “Enough with your babbling Roie, just tell us how to take the picture already…” Oh well, I didn’t know you’re so stressed. So here is how you perform the technique, step by step:

a.     White balance – Infra-Red hues are more than red (well duh…), they are so red that their white balance is off the scale of the automatic and preset WB in most cameras. That is why we need to perform manual white balance with a white piece of paper, or an 18% gray card to get the more precise colors, or perform the white balance on a green surface like grass to increase the effect of white foliage. If you think about it, it is better not to photograph with RAW because even with most RAW editing programs you can’t reach a white balance less than 2000 Kelvin degrees while the IR’s is much shorter.

b.    Light Metering – Light Metering should be performed with the camera in an evaluative metering mode, and don’t worry too much, in most cases the metering will turn out fine. You should watch out for burnt areas because in IR they turn out blue the more you get near them. If it’s necessary, you should apply some negative exposure compensation and then adjust levels in photoshop, but most importantly avoid burnt areas. It is highly recommended to switch to manual mode (M) to get the most accurate exposures with the best control.

c.     Focus – You should perform the focus before adding the IR filter to make sure that you focus correctly and switch to manual mode to maintain the focus. If you are lazy, you can use manual focus and estimate the distance (in that case automatic is better).

d.    Aperture – It’s recommended to photograph with relatively small apertures and avoid open ones. This is because we lose a little sharpness in IR photography and shutting the aperture helps a lot in that way. In compact cameras an aperture of F/5.6 and in DSLRs and aperture of F/11 should do the trick.

e.     Shutter – Due to two reasons, a small aperture and low IR sensitivity, we are forced to use slow shutter speeds, for better and for worst. Why better? Because a special effect is produced over water and clouds in very long exposures. Why worse? Because you need a tripod and it’s difficult to capture moving objects (people, animals etc.).

f.     ND filter – Sometimes it’s better to photograph with an ND filter that reduces the amount of light entering the camera even more in order to achieve longer exposures and improve the effect.

g.    Location – It’s best to shoot from a shaded place. First and foremost, because it's hot to stand in the sun, and second because the camera loves shooting from shaded places. In addition, I would recommend blocking the viewfinder in DSLR to prevent light for leaking into the system. 


6.   Compositions – It’s possible to achieve very special images, but we can also use special compositions to get better effects. The following rules are only additions to the known laws of composition.
a.     Sky – the sky turns out dark and the clouds turn out bright. This creates an excellent and dramatic contrast that can contribute greatly to the photo.
b.    Foliage – we should attempt to capture special structures of foliage that can be interesting when we should keep in mind that all foliage will turn out completely white.
c.     Water – because of the long exposure water will appear with a very unique silky texture. This can be used and improved with reflection games.
d.    Structures – It’s very nice to photograph familiar structures with foliage around them and create a very dramatic photo that people will be awe-struck when viewing it for the first time.
e.     People – It’s pretty hard to incorporate people in the photo, and if you do try and photo them, it’s better not to show faces (unless the purpose is to spook). If you incorporate people or animals, then you should open the aperture a bit to shorten the exposure time. 


7.   Post processing: After taking the photo, the job is far from over. We shall now switch to Photoshop to see how we improve the frame to a special and appealing look. I take it that you are familiar with the basics of Photoshop.

a.     Switching channels – When first opening the photo, we will see a photo like in the example attached, in brownish-red hues (depending on what type of white balance we used). This photo can be useful, but I also want to show you a result that is more soothing to the eye. We open the Image menu > Adjustments > Channel mixer and choose the later. A window will open like in the attached example. Under the red channel you should reduce the red from 100% to 0% and increase the blue from 0% to 100%, and on the blue channel do the opposite – decrease blue from 100% to 0% and increase red to 100%. There you have it, the channels are switched (as simple as with the TV…). (It is recommended to click on the images to enlarge them)


b.    Adjusting Levels – It might be that the photo is still not with the hues that we desire it to have and that is why we will adjust the levels properly (Ctrl+L) and adjust the color balance (Ctrl+B) to achieve colors that are more suitable to us, in the shadows, midtones and highlights.


c.     Sharpening – Because there is a certain degree of fuzziness, it is recommended to perform sharpening with Unsharp mask as necessary (reminder – Filter > Sharpen > Unsharp mask). I used the following parameters: Threshhold: 1, Radius: 2.0, amount: 80%.


d.    After the processing is done you should have a result similar to this. But of course you can perform different processings including the incorporation of a regular photo and an IR photo in two layers etc.etc. The sky’s the limit. 


e.     Naturally, it's possible to present the photo in black and white with all the techniques of turning it black and white and not in color. The results are very interesting as well.

8.   Summary:
As we see, Infra-Red isn’t a very simple technique but despite that any one can use it (with the right equipment). I personally love this technique and I know that you can undoubtedly reach incredible results with it. I hope that this guide was clear and I hope you learned something new and enjoyed it.


Infrared Photography

What is the Infrared Spectrum? Well, take a good look around you and you’ll see and endless diversity of hues in all the colors of the rainbow: The grass is green, the sky is blue, the roses are red and the future is bright. Now imagine that on top of all the colors you can see, there are other ranges that are normally invisible to us, colors that for us don’t exist but they’re out there and for some animals they are a part of everyday life. This is the Infra-Red (IR) spectrum and in this article you will learn how to photograph it effectively.

Light metering

Introduction
Proper exposure times are essential with any kind of photography, especially when you use slide film that has a narrow exposure range. Since the sky can have huge differences in brightness, it requires a bit of experience using your exposure meter properly. In some cases you won't get away with just aiming your camera at some part of the sky and taking a photo, putting all your faith in the camera's light meter.

Example of bad metering: underexposed sunsets
The exposure errors that I most hear are complaints about underexposed sunset pictures. This is probably because many people photograph sunsets (compared to other things in the sky) because they are pretty. I am taking this example because it is easy to explain how to meter sunsets correctly, and it applies to several other subjects in the sky.

Imagine taking a picture of a sunset, while the sun is low in the sky, or maybe just set. If you meter the frame while you have your camera aimed, the camera meter will see the sun, or clouds very near by the sun, that are much brighter than the rest of the sky (which is what you want to expose properly). The camera light meter thus thinks the frame has a high brightness and meters according to a short shutter speed and/or high f/ratio. The result is that the clouds very near the sun become properly exposed, while the rest of the sky becomes several stops underexposed and thus very dark to black.
An underexposed sky with some very small clouds near the sun that are properly exposed, is much worse than having a properly exposed sky with the small clouds near the sun overexposed; this looks much more acceptable.
Manual metering
The way to correctly meter a sunset is to meter on a small part of the sky away from the sun, any part of the sky that you want properly exposed, and then use those exposure settings while taking a picture of the sky with the sun (or other very bright parts of the sky) in it.
This technique requires that the camera either has some kind of exposure-lock (meaning you can lock the exposure settings while you move the camera to a different part of the sky), or that it has manual exposure.
The picture below illustrates this technique. It is important to remember this if you consider yourself a beginner, because you need to use this technique for many weather subjects! I will call this technique manual metering for the sake of reference. Not only does it apply to taking pictures that need to be properly exposed when a bright object is in the picture, but also to pictures with a large dark area in the picture that you want to keep dark on the photo (e.g. a photo of surface fog taken during the night).
Subjects that require manual metering
Some subjects that need to be metered manually are most atmospheric optical phenomena such as cloud coronas, iridescence (usually), all halos (if near the sun); some cloud types such as bright cumuliform clouds, noctilucent clouds, and in general any clouds that you photograph with a polarizing filter; most astronomy such as wide-sky astrophotography, zodiacal light etc. (although most camera light meters are useless for such low light levels anyway), sunrise/sunset colors, and last but not least snow.
Snow and ice are notoriously difficult to expose properly. Because snow is so bright, when you meter a snowscape the photo will turn out one or two stops too dark - the snow will be medium grey and all other parts of the photo will be dark or black.
Using a grey-card
A good technique here is to lay down an 18% grey card in the snow and meter on that card, without any snow in the metering frame. You will then be able to determine the correct exposure time for grey areas in your frame, and with that exposure setting the snow will still appear white on the final frame.
Grey cards are available from most professional photo stores. Kodak makes good-quality grey cards that reflect 18% of the incoming light, while the reverse of the card is white, useful for white-balancing digital cameras. Another company that makes high-quality grey cards is Sekonic. These cards come with full instructions on how to use them, not only for reflective light metering but also other techniques for which they are useful.

Tips for proper metering

  • if you are unsure about which parts of the frame or sky to meter on, take sepveral photos, bracketing your exposures (i.e. taking several exposures each with one or half a sto difference around the exposure setting that you think is right).
  • use as few different types of film as possible for your general photography. Not all film responds the same way to light for different subjects.
  • periodically calibrate the light meter of the camera, especially if you obtain an unusually large number of improperly exposed photos. You can calibrate (or at least check) the light meter by comparing its response to that of light meters of other cameras.
  • always try to meter on areas in your photo that are as neutral grey as possible. If there are no such areas, try to meter with many different colors in the frame. This gives more accurate readings.
  • never meter on the foreground if you are taking pictures of the sky. The foreground is most often a few stops darker than the sky. Conversely, never meter on the sky if you are taking pictures of something on the ground.
 

Processing your own films

Introduction
Most amateur and professional photographers who still use conventional film don't process their own film. I think this is because most don't know what is involved in processing film and think it is something complicated and expensive. It is not! Processing your own film is actually quite easy when you are past the quick learning curve, and it has several advantages over lab processing:
  • you can process the film when you want, also in the middle of the night, and you have the results immediately
  • it is cheaper in the long run
  • it is faster than bringing it to a lab, if you shoot only a few rolls per week
  • the film will have no scratches, fingerprints and drying spots if you handle it correctly (i.e. better than most labs)
  • complete control over pull- and push-processing, contrast and color balance
  • you are solely responsible for how the film comes out: you don't depend on other people who can mess up your film! If you mess up your film, at least you did it yourself.
Standard C-41 or E-6 film processing is quite simple. Are you eager to process your own film, possibly because a lab once completely messed up your film? Below I explain what you need and how to do the processing with minimal risk of error and maximal satisfaction. This is only my own experience though - but I have processed most part of my collection of films myself (576 rolls at the time of this writing), and never ruined any of them. Most of the few films that I ever brought to a lab came back either scratched, with fingerprints, or film strips cut badly (through frames).
This document assumes that you are processing standard 35-mm format film. 120 and 220 medium format film is also fairly easy to process, but must be handled more carefully.

What you need
You will need the following to do your own processing, using the hand-inversion technique. This technique is fully manual and the cheapest to start with.
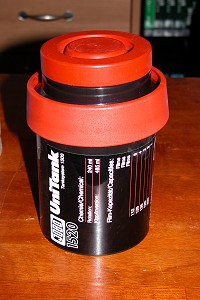
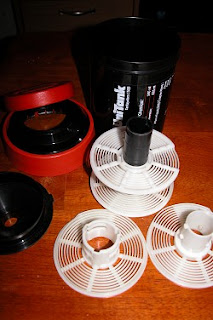
  • hand-inversion processing tank with film spirals (the spirals are what the film is loaded on to)
  • dark room (not necessarily a darkroom! Just a dark closet will do)
  • processing chemicals
  • one 1 liter (about 1 qt) graduate  
  • one 100 ml (milliliter) graduate
  • four 600 ml storage bottles
  • thermometer that will read around 38C (100F) preferably with a precision of 0.1oC
  • flat kitchen sink with stop, and hot/cold water

The graduates, tank, chemicals, storage bottles and thermometer are readily available at professional photo stores and mailorder companies. The tank will be around $30 to $50 including the spirals; chemicals are around $15 per 500 milliliter (makes enough for 6 films) or $80 for a pack that makes enough for 60 films. The thermometer and the graduates cost about $40 total.
The dark room can be a closet (like I use; I don't have space nor money for a darkroom). Just make sure that when you are in the closet, there are absolutely no light leaks; you should, after you let your eyes adapt to the dark for 5 minutes, not be able to spot any light coming in under the door or elsewhere. Film needs to be loaded into the tank in the absolute dark to prevent the film from fogging.
The kitchen sink will have a standing water bath of 38C, assuming you are processing color print film (C-41) or slide film (E-6). (Most Kodak and all Fuji color films use these processes.) This water will continuously cool down at the rate of about 1 C per 5 minutes; you need to have a tap with hot water running at a trickle, or have a kettle with hot water on a stove, to keep the temperature constant. Short-period variations of +/- 0.5oC are acceptable. The tank with the film and the four 600-ml storage bottles containing the chemicals will be in this water, at the same temperature.
Once you have all these things, processing just costs around $1.35 per film if you buy larger packs of chemicals. I don't know a lab that will process slide and print film so cheaply with the high-quality results you get! This is why I say that it is cheaper in the long run. You still need to spend $100 or so for the equipment, but once you have this, it won't be long before you save that money by processing your own films.

Loading film into the tank
Usually when you rewind a film in a camera, the film gets spooled all the way into its canister. Bring a pair of strong pliers or a bottlecap opener with you to the dark room, as well as a pair of scissors. Also bring the tank with the spirals and set everything close to you before switching off the light, so you know where to feel in the dark to find something.


In the dark, take the film canister and open one of the ends with the pliers or opener. This works best on the end of the film canister that does not have the protruding axle. When you have the cap off, push out the axle with the film, taking care not to scratch its surface along the sharp edge of the metal.
Next, you cut the smaller end of the film off (about 3 cm or 1 inch) with the scissors, and stick the end of the film in the spiral. The spiral should have two notches on its sides that allow you to put your finger on the edge of the film, keeping it in place. Then, while carefully unrolling the film, wind it on the spiral as you go. Loading a film onto a spiral is easy, but you have to practice with a piece of wasted film in daylight first, and then in the dark also. The technique (at least for the plastic spirals I use) is to put your right index finger on the right side of the spiral, keeping the film in place, while you rotate the other side of the spiral a bit (the spiral consists of two parts that can rotate a short distance). Then repeat, keeping your left index finger on the left half of the spiral while you rotate the right part. It is easy to see once you try it, and it is fast.
Try to avoid having the surface of the film come in contact with anything like your fingers, body, clothes, the floor, etc. Only handle the film by its edges. Also, do not accidentally bend the film.
The end of the film will be fastened to the axle by tape, or stuck in a slot. Cut the end off, but cut it as short as possible, since the last frame of the film is often perilously close to the end. Then continue loading the film on the spiral until everything is on.
When done loading the film on spirals, put them on the center hub in the tank, and close the lid. Make sure all tank components are in place! If you forget one part, there will be a light leak and the film will be spoiled.

Mixing chemicals
Mixing chemicals is a somewhat precise job but it is fast and easy. I highly recommend using distilled water for mixing, at least for the final (stabilizing) bath; if you use tap or drinking water, there will almost certainly be drying stains on the film later.


The chemicals come with a booklet that contains information on how to mix the chemicals. The different baths for normal C-41 (print) processing are the color developer, bleach/fix, and a stabilizer. E-6 (slide) processing differs from this in that there is a first developer, that comes before the color developer. Most or all baths come in two parts that you have to mix with water. Depending on your tank, you need a certain amount of developer to fill the tank enough for the entire spiral(s) to be submerged. If you use the Jobo Unitank 1520, you can make exactly 500 ml of developer which will process 6 rolls of film, and process two rolls of 35mm, 36-frame film per time in the tank.
When you mix chemicals, always have at most one bottle open at any one time to avoid confusing the caps or contaminating the concentrates. This must be avoided at all cost! Also, first mix the earlier baths and then the later baths in that order, so if contamination of your working solution occurs, at least it is forward, which is less bad. Contamination of concentrates, and contamination of earlier baths by later baths would be bad.
You may want to use a finer-scaled graduate than the 100 ml one I recommended; the 100 ml graduate is fine if you make 500 ml at one time, since then you will need up to 100 ml of concentrates.
First developer usually comes in one part of concentrate, as does the stabilizer; color developer and bleach fix come in two parts.
All concentrates (and working solutions that are not used immediately) should be protected against oxidation. The easiest I found to work is to use butane gas for this, since this is a heavy gas and displaces the oxygen. Other people (and me too, once) use marbles to fill up space in bottles, but this is highly impractical.
Some people advise strongly against the use of gas to lengthen the storage life of concentrates. They say it is dangerous! They are very right in that. But then what about using a gas stove to cook food? If you use common sense, there is no more danger in using shield gas for your chemicals than there is to drive a car to the supermarket, or cross the street for that matter. Even so, decide for yourself if you want to use flammable butane gas for this purpose or rather choose to buy small amounts of chemicals to use at one time, every time. I will not be responsible for accidents!
Concentrates unprotected against oxidation will only keep for a couple weeks, otherwise they keep over a year if the bottles are closed tightly.

Preparing and maintaining a warm water bath
The temperature of the water bath is essential for the processing. Have the level of the water bath approximately at the same level as the developer in the tank will have later.


When you first mix the chemicals they may be at room temperature, or 20oC. They need to be in their storage bottles within the warm water bath for about 30 minutes at least to warm up to the same temperature as the water. The water however will be constantly cooling (unless you use a thermostat ofcourse), especially when you put bottles with cold liquid in it, so make the bath about 42oC and let it cool to 38oC (or whichever temperature your developer needs, but 38oC is standard). The thermometer should be in the warm water bath constantly, so you can monitor the temperature precisely. (Tape it to the side of the sink, close to where the tank is.) Also, before processing, check the temperature of the solutions to check if they are the correct temperature.
38oC is about equal to 100oF, in case you are used to the Fahrenheit scale instead of centrigrades.
The water bath will get contaminated with solutions during processing, because some will always leak into the bath while you hand-agitate the tank by inverting it every 15 seconds. Therefore, after every batch of film you process, start with a new bath, to avoid contaminating the first developer, and any bath that comes before another bath in general.
The warm water can be kept at fairly constant temperature by letting hot tap water run into it at a trickle. Practice this technique first so you get a feeling for how much hot/cold water you need to increase/decrease the temperature of the bath by a certain amount. Stir through the water with your hands when you let water at a different temperature in, to get an accurate reading of the thermometer.
Preparing to process
Processing starts by putting the tank with the film (but without chemicals, still) into the water and hold it down with a weight, like a drinking glass or something. This should be done to get the tank at the same temperature as the water; if the cold tank would be filled with developer, the developer would instantly cool down several degrees and this would not be good.
While the tank warms up in the water, check that you have all solutions ready and at the correct temperature. Also arrange all bottles in the water (label them!) so that there is no chance that you will put in the chemicals in the wrong order; the film would then be ruined. Next, make a list of all processing times, that starts about 10 minutes in the future to give yourself time to get fully prepared. Do all timing and thinking before you start the procedure, since you can't really stop midway, and having a routine reduces the chances of catastrophe. An example list of times would be like:
10:23:30 1st developer in
10:30:00 rinse 3 minutes
10:33:00 color developer in
10:39:00 rinse 3 minutes
10:42:00 bleach fix in
10:48:00 rinse 3 minutes
10:51:00 stabilizer in
10:52:00 stabilizer out

When you are done writing up the times, check that the difference is equal to all individual times of every process. Re-check the list several times if you are not completely sure.
The list above is representative of E-6 processing like I do; 6m30s for first developer, 6 mins each for color developer and bleach fix, and 1 minute for the stabilizer. Between each bath there is a rinsing procedure, in which you let water of approximately 38 C in the tank, agitate continuously and let it flow out every 30 seconds or so. There is no rinsing with water after the stabilizer. If your chemicals don't come with stabilizer, rinsing with water after the bleach fix is the final procedure.
If you have a darkroom timer, it gets easier, but make sure you keep track of which bath is going in. Having a list like this that is absolute in the time of day won't confuse you. Also make sure that all bottles are clearly labelled.
Processing
When the first time on the list comes, lift the tank out of the water, remove the cap and quickly pour in the first developer. Then put the cap on tightly, and forcefully (not too forcefully) tap the tank on the sink a few times to remove air bubbles (these could otherwise ruin your film, since they cause discoloration!). Then invert the tank for a few seconds, turn it back and tap again, etc. Repeat this procedure for 30 seconds, then put the tank in the water bath. Every 15 seconds, invert the tank again for a few seconds, then tap it to the sink and put it back in the water. You need to be absolutely concentrated doing this. Don't let anything like a phone call or something else divide your attention! If you walk away longer than just 30 seconds or so from the tank without agitation, the film will almost certainly get streaked due to uneven processing.
While you are counting every 15 seconds, keep an eye on the temperature of the water and adjust if necessary.
One minute before the time comes to remove the bath, open the tap and adjust its temperature using the cold and hot water until you have flowing water of 38oC. Have the 1 liter graduate ready (make sure it is absolutely clean!). During this, keep inverting the tank every 15 seconds, don't forget this. When it is time, remove the tank cap and pour the developer in the graduate. Don't use longer than 15 or 20 seconds doing this, or there may be streaks on the film later. Then start rinsing by filling the tank with tap water, agitating it, emptying it, refilling, etc.
You will notice that during the few minutes of rinsing, the water bath will cool down. Try to have it at the correct temperature when you are ready for the next solution. It requires a bit of multitasking, but when you get a little experienced and the workflow going, it is fairly easy.
The storage bottles of the solutions that you used should remain out of the water, as to not confuse you later. Pour the solution back into its bottle from the graduate and rinse the graduate thoroughly every time. This all applies if you are reusing the solutions for later processing batches, something you can and should do.
For the succeeding solutions, proceed in the same way. When you are done with the bleach fix, however, you can actually open the tank up to rinse it more thoroughly. I recommend that the film is washed a long time, 5 to 10 minutes being optimal, although 3 minutes of rinsing is enough if it is done thoroughly. After that, pour in the stabilizer and let it stand for a minute.
Drying the film
One of the most rewarding (or disappointing, sometimes!) moments of the whole photography hobby is to pull the film off the spirals and see for the first time all the exposures, and then realizing that you did everything yourself.
It is tempting to inspect the film at this point, but try to resist: the film will be completely wet, not only on its surface but also within, and the colors will be more blueish than when it has completely dried. It is very easy to damage the film when it is wet.
Handle the film very carefully, not letting it touch anything while you walk with the entire strip to the place to have it dried. For drying, the easiest is a string or cord where you'd dry clothes on, and hang the film with a clothespin on the line. Also attach a clothespin at the lower end as a weight to keep it straight. Then walk away and do not disturb the drying room, or there may be dust in the room attaching to the wet film. Never "pre-dry" a film using a rubber stripper or alike. Doing so will almost certainly scratch the whole film. If you prepared the stabilizer bath with distilled water, or - in case there was no stabilizer - if you rinsed the film lastly in distilled water, the film will dry absolutely clean without stains.
It takes between 1 to 4 hours for a film to dry completely, depending on the atmospheric humidity. After drying the film, carefully cut it in 5-frame or 6-frame strips and store these immediately in a film storage sheet. Do not under any circumstance keep the individual strips out of protection to prevent them from being scratched. It is amazing how easily a film will scratch - sometimes you won't even see the scratch with the naked eye, but only when you make a large enlargement.
Some general advice
Some of the items below may sound a bit silly, but all of these have helped me avoid catastrophe at some point in time, therefore I am sure they will be helpful for others!
  • Try to depend as little as possible on mains electricity: having a candle or flashlight nearby, as well as a battery-powered clock will avoid major problems if there would be a power blackout.
  • Wash and completely dry your hands before you handle film.
  • Do not eat or drink while you are processing film. The processing chemicals are toxic. Also, avoid inhaling vapors, especially the stabilizer bath.
  • Make sure all graduates and such remain completely clean. In particular, clean the tank and spirals after every processing run. Avoid having the chemicals contaminated with one another. Never interchange storage bottles for chemicals that have contained another chemical before.
  • When you do multiple processing batches, the spirals and tank should be completely dried after each batch. Loading film on a wet spiral is very hard to impossible and will damage or stain it.
  • In general, make every action into a routine, and make every routine as fail-safe as possible. This will prevent you from doing actions that are not part of your routine and thus may be hazardous to your film. Follow routines, but don't get too automatic doing things!
  • The tank should be absolutely level in the sink. If it is a bit tilted, the film may not be completely submerged in the chemicals everywhere.
  • If you reuse chemicals for further batches, keep in mind that you loose some of it during every bath, especially of the first developer that enters into a dry tank every time. You may need to add a little water to the solutions from time to time if the amount of solution is close to the minimum suggested tank capacity. After doing this, let the solution get to the correct temperature again.
  • Make sure the water with which you rinse the film between baths is as close to 38oC as possible, to avoid getting small cracks in the film substrate.
  • If for any urgent reason the processing needs to be interrupted, immediately pour out the chemicals and rinse the film thoroughly with water. While you solve the problem, the film should remain under water at all cost to prevent drying stains: fill up the tank with water and try to continue processing as soon as possible. Only interrupt processing if absolutely necessary; it is generally not so good for the film.
  • The fastest method to learn how to process film is to have a tutor and have him or her supervise you during your first attempt. If there is no-one around, practice processing films yourself by using a test-film first, with exposures that are not critical. Do not be discouraged if at first things don't go too well.
  • Use common sense and make sure you are completely awake when you process film! Think with anything you do, e.g. before pouring in a chemical into the tank, think and check that it is the correct chemical.